Classroom Control – User Guide
Classroom Control makes it simple for teachers to organise all their digital content to enhance the student experience. Any web content is always checked to ensure it is safe and appropriate and they don’t need to rely on IT managers to assist with lesson creation and delivery.
This User Guide for Teachers, provides step by step instructions with illustrations, to demonstrate how to create and manage lessons and use all the features to manage internet accessibility in the classroom. The simple functionality allows teachers to prepare multiple lessons ahead of time and during the class, disable student access to other sites, control access in and out of a live lesson and choose how long the links are available for students.
Teachers manage:
- Opening of specific sites that are currently blocked by the school’s web filtering policies.
- Making sites available only to the students in the class.
- Access for a restricted period of time e.g. making the length of the lesson 45 mins.
- Control to disable access to other sites other than lesson sites.
- Individual students into and out of Classroom Control.
ACCESS CLASSROOM CONTROL
Access to the Classroom Control interface is available via the LiveZone portal live.localnetwork.zone OR access via LMS if available.
TIP: save link as favorite in your browser to access easily next time if not available via your LMS.

CREATE LESSON
Teachers can prepare and create multiple lessons and there are 3 options to create Lessons. You can create different lessons using any of the options and you can use any lessons over and over again, keep adding more relevant links or remove obsolete content.
A unique 4 digit code is generated once each lesson is created and when provided to students, allows access to content normally blocked to students.
- URL’s – add links to specific content on website
- Web Filtering Override – allow access to any web content
- Whole Domains – add links to websites
NOTE: 2 and 3 require IT to enable before access is granted

1.NAME – create a descriptive name for the lesson that is easy to identify for future use. e.g. Year 9 Geography – Volcano.
2. CREATE LESSON – After typing the name, click ‘+Create Lesson’.
NOTE: Once the lesson has been created, the description cannot be modified. Delete and re-create lesson if the description needs to be changed.
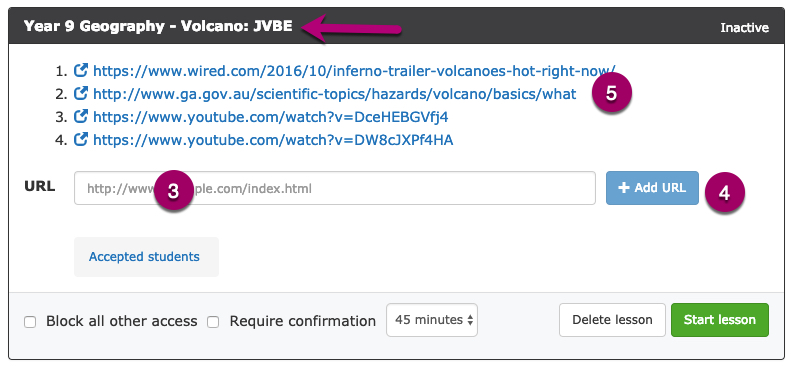
3. URLs – copy and paste the URL from the webpage you require for the lesson. (see below for options Web Content and Whole Domain)
4. ADD – Simply click ‘+Add URL’ to create digital lesson content.
5. SAVED – Multiple URLs can be added and saved for the lesson.
NOTE: In the example provided, JVBE is the unique 4 Digit access code generated when the lesson is created. Students use this code to access the lesson in the classroom. It is not case sensitive.
iPad – Apps and Mobile URLs. If Classroom Controls is set to ‘Block all other access‘ then no Apps would be accessible as Apps rely on internet access. Also students (and teachers) using iPads to access Classroom Controls requires a different URL address for mobile devices. The URL is changed to add an m after the https://, so if you have a class with mixed devices you would need to include both URLs.
OPTIONS WEB CONTENT & WHOLE DOMAINS
These 2 options require IT to provide specific permissions before the drop down option is available. If these permissions have been enabled, when you create a lesson, there will be a drop down option to select from.
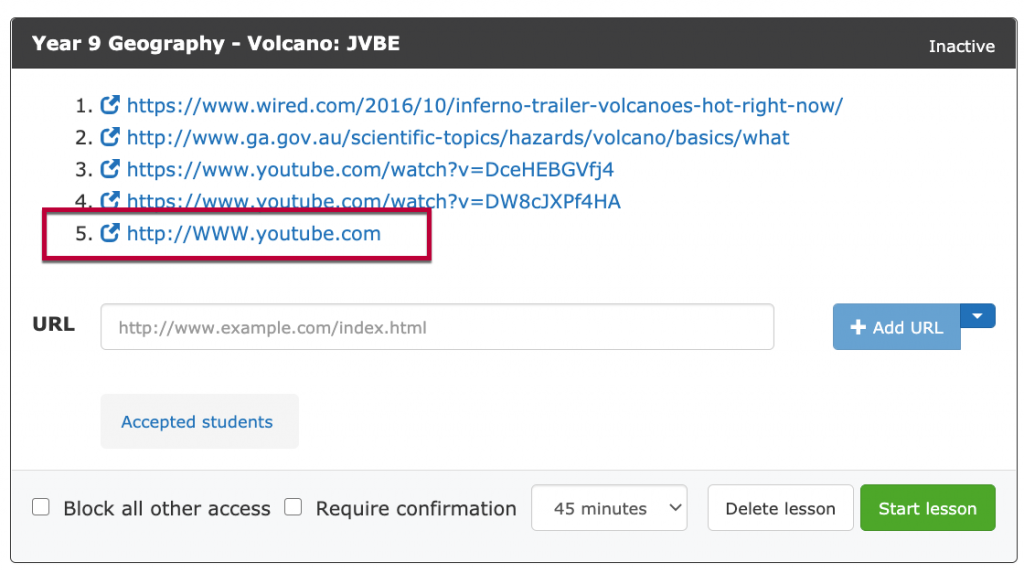
- Beside the ‘+Add URL’ click on down arrow and select the option required.

WEB CONTENT OVERRIDE: This option does not require any links, it allows students access to content that is normally blocked. This option does not allow ‘Block all other access’ (see below). If you click on ‘Disable Web Filtering Override’ it reverts the lesson to adding URL’s option.

WHOLE DOMAINS: Adding links to a website (domain) rather than specific content. e.g. www.youtube.com allows access to open all of YouTube.
You can have a mixture of URL’s and whole domains if needed and the feature to ‘Block all other access’ is still available.
MANAGE LESSON
Classroom Control provides easy management of all created lessons and the flexibility to modify at any time. All lessons created are saved for future use.
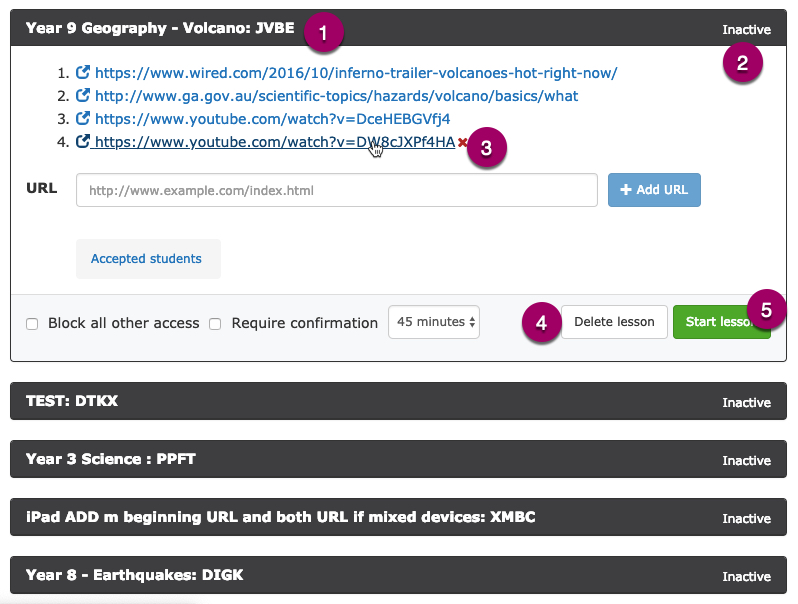
- SAVED – all lessons created are saved permanently.
- VIEW LESSON – Click on ‘Inactive’ to expand and close the lesson.
- BROKEN LINK – Click on the red X checkmark to remove broken links or links that are no longer required.
- OBSOLETE LESSON – Click on ‘Delete Lesson’ to remove a lesson from the list available.
- START LESSON – Simply Click ‘Start Lesson’ in the classroom to activate the lesson for students.
LESSON ACCESSIBILITY
Once the lesson is created, teachers can manage the content that the student can access.
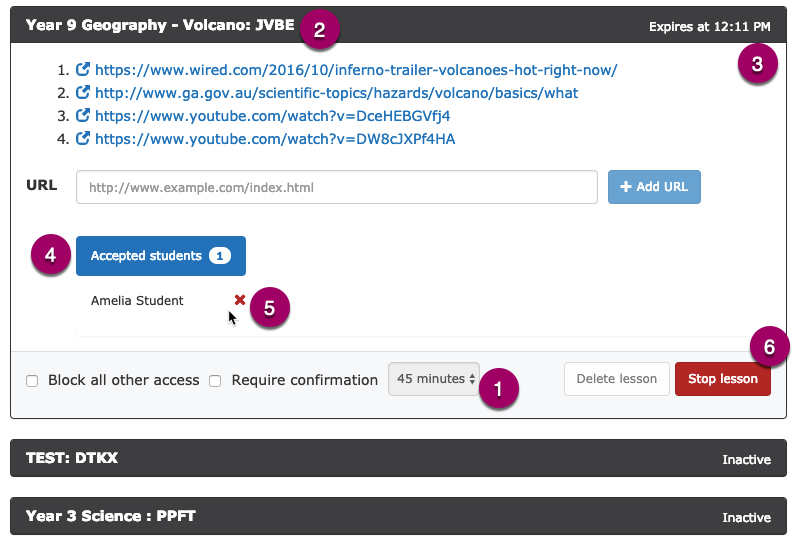
- DURATION – Options available are 15, 30, 45 and 60 minutes and 1.5, 2 and 3 hours. Once ‘Start Lesson’ is selected, the duration cannot be changed.
- ACCESS CODE – 4 Digit code to provide to students for access to the lesson. ‘Start Lesson’ needs to be active for students to access URLs.
- EXPIRES – the expiry time is displayed during the lesson and visible by both teachers and students.
- VIEW STUDENTS – Click the ‘Accepted students’ tab to display a list of all the students active in the lesson. The tab also indicates the number of students active in the lesson.
- REMOVE STUDENTS – Control access during the lesson and remove individual students when required without disruption to other students. Simply hover over ‘Student Name’ and click on the red X checkmark.
- STOP LESSON – Click ‘Stop Lesson’ to close the lesson and lock out all students.
BLOCK ALL OTHER ACCESS
Classroom Control provides teachers with the option to block students from accessing all internet sites other than the content for the lesson. Teachers are able to release individual students from the block when requested by the student.
Benefits:
- Keeping students focused during the lesson, not straying onto other webpages.
- Lockdown for classroom exams.
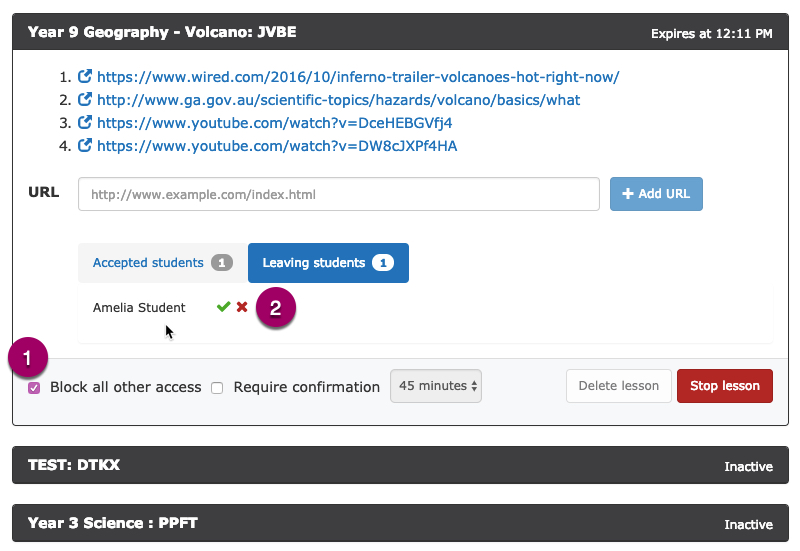
- BLOCK ALL OTHER ACCESS – Tick or untick the box to turn on and off this feature. When block is ticked, a ‘Leaving Students’ tab will be activated. When selected, only the list of students requesting to leave the lesson are visible. The tab also indicates how many students have requested to leave the lesson.
- LEAVING STUDENTS – Flexibility to allow or deny the release of a student from the lesson without disruption to other students. e.g. a student may finish activities early and may request to leave to conduct own research etc.
- Click on the green tick to release student from lesson.
- Click on the red X checkmark and the student will remain in the lesson.
When left un-ticked, the students will have access to the lesson URLs and other internet sites within the parameters of the Access Policies.
BLOCK ACCESS TO ALL INTERNET
Teachers may need to block all access to the internet for the duration of the class. It is useful for exam lockdown and keeping students attention focused during a lesson.
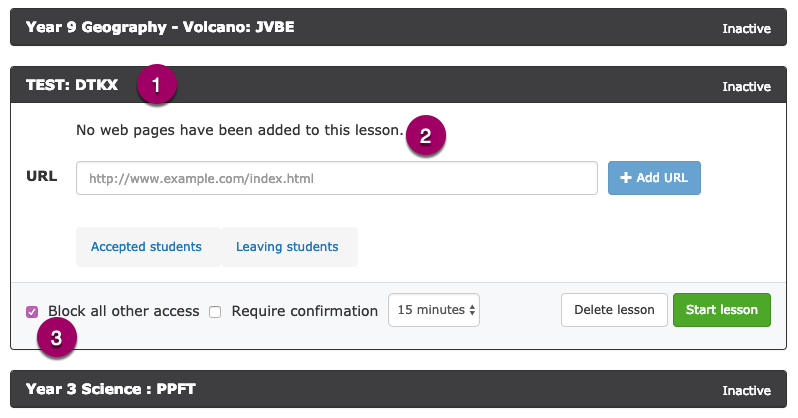
- CREATE LESSON – Create a new lesson with a descriptive name.
- NO URLs – Do not add any URLs to the lesson.
- BLOCK – Tick ‘Block all other access’. When students use this code, it will block all access to the internet for the duration of the class.
REQUIRE CONFIRMATION
Classroom Control provides teachers with an option to use the ‘Require Confirmation’ feature, which offers control over who is accepted into the lesson.
Benefits:
- Higher level control for sensitive sites by individually confirming or denying student access to lesson.
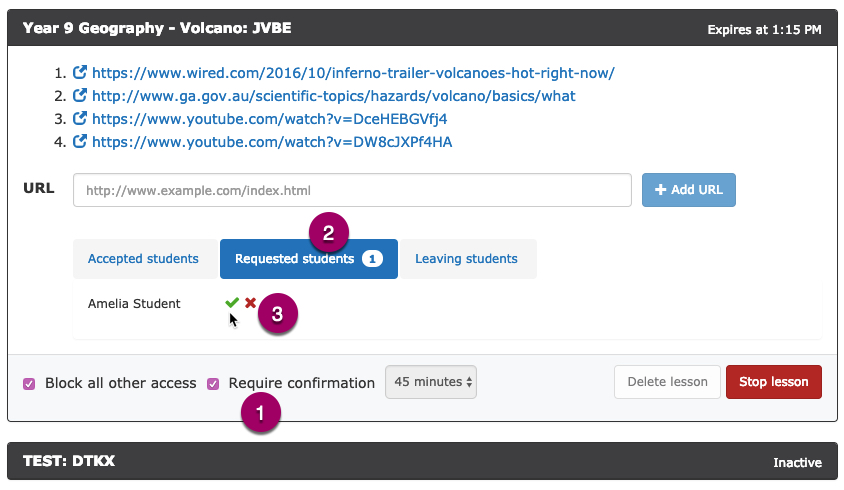
- REQUIRE CONFIRMATION– Tick or untick the box to turn the feature on and off.
- REQUESTED STUDENTS – An additional tab is activated providing a list to view students who are waiting to be accepted to the lesson.
- INDIVIDUAL CONFIRMATION – Students will NOT be able to access the links unless they have been accepted by the teacher.
- Click on the green tick to accept student into lesson.
- Click on the red X checkmark and the student will not be able to access the lesson.
STUDENT ACCESS & VIEWS
Students can access the lesson via the Classroom Control interface or the Access Denied page for the link.
Classroom Control student interface is available via live.localnetwork.zone
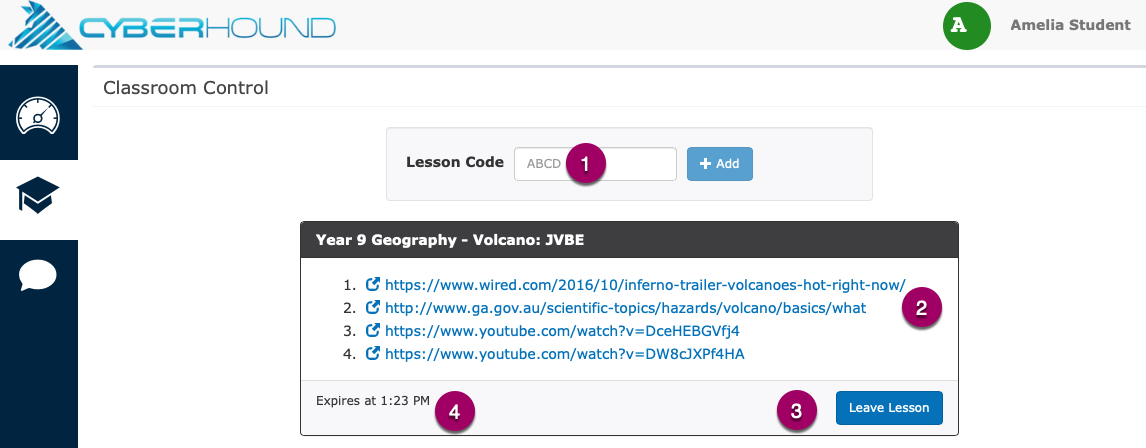
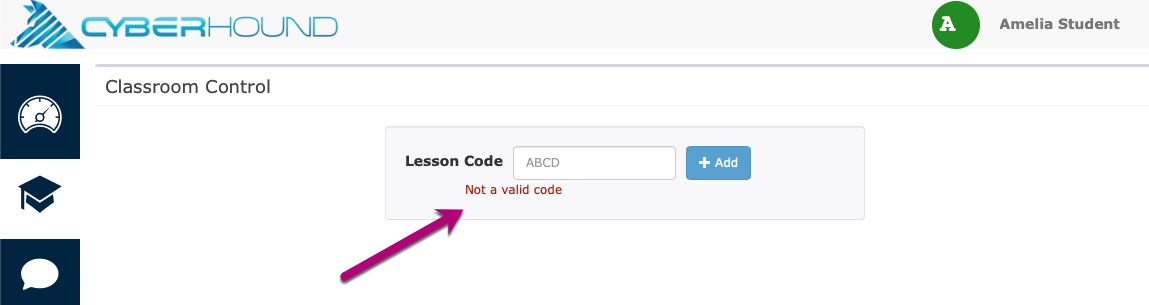
- Students enter the 4 digit code and click ‘+Add’.
- The lesson will display and access to open links is now available.
- Students can request to leave active sessions.
- Students have visibility to the lesson finish time when the links are then longer available.
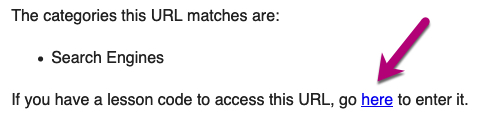
Browser – Students may be provided with a lesson URL and when entered into the browser, will be presented with the ‘Access Denied’ page.
Students click on the ‘go here’ link and are directed to the Classroom Control interface.
NOTE: If the teacher has not started the lesson, the student will see a message that the code is not valid.
STUDENT VIEW – BLOCK ACCESS
When the Teacher has used the ‘Block all other access’ option, students will click ‘Leave Lesson’ when requesting to leave the lesson and gain access to other internet sites. Once the teacher has confirmed release, the student will no longer have access to the lesson links.
When ‘Block all other access’ is activated for the lesson, should a student attempt to browse another webpage, they will be presented with the ‘Access Denied’ page.
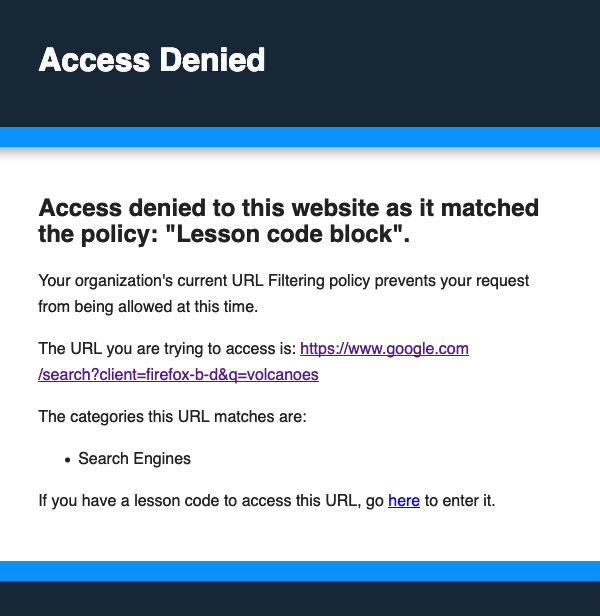
- Students simply click ‘go here’ to return to the Classroom Control interface.
STUDENT VIEW – CONFIRM ACCESS
When the Teacher has used the ‘Require Confirmation’ option, the student will not be able to access the links until accepted to the lesson by the teacher. When this feature is activated, the student view will display ‘Requesting Access’ until they are accepted.
